How to Set Up Dual Monitors on Windows

Maximize your productivity by setting up dual monitors on Windows. Follow this easy step-by-step guide to enhance your workspace with multiple displays.
Setting up dual monitors on Windows can significantly improve your workflow, providing more screen space for multitasking, gaming, or creative work. Whether you’re using Windows 10 or Windows 11, configuring two monitors is simpler than you might think. In this guide, we’ll walk you through everything you need to know about setting up dual monitors on Windows.
Using dual monitors can dramatically enhance productivity, especially in work environments that require multitasking. By extending your desktop across two screens, you can have multiple applications open side by side, eliminating the need to constantly switch between windows. Whether you’re editing documents, coding, or managing data, a dual monitor setup allows for smoother workflow and faster task completion. Studies have shown that dual monitors increase efficiency by up to 30%, making them a valuable tool for professionals, gamers, and creatives alike. Setting up dual monitors on Windows is quick and easy, requiring just a few simple steps in your display settings.
Why Use Dual Monitors on Windows?
Dual monitor setups offer a variety of benefits, including:
- Increased productivity: Work on multiple tasks simultaneously without switching between tabs or applications.
- Better multitasking: Easily compare documents, code, or images side by side.
- Enhanced gaming and media experience: Enjoy a more immersive experience in games and media.
How to Set Up Dual Monitors on Windows
Step 1: Check Hardware Requirements
Before setting up dual monitors, ensure your computer supports multiple displays. Most modern computers with a dedicated graphics card can handle dual monitor setups. Here’s what you’ll need:
- Two monitors
- A compatible computer
- HDMI, VGA, or DisplayPort cables for connecting monitors
Step 2: Connect Your Monitors
- Turn off your computer.
- Connect the second monitor to your PC using the appropriate cable (HDMI, DisplayPort, or VGA).
- Once connected, turn your PC back on.
Step 3: Configure Display Settings Windows 11
Once both monitors are connected and powered on, you’ll need to adjust display settings in Windows:
- Open Settings: Select Start , then open Settings .
- Select System > Display: Under System , select Display . Your PC should automatically detect your monitors and show your desktop. If you don’t see the monitors, select Multiple displays , then Detect.
- Adjust Display Arrangement: Use the dropdown list next to the image of your desktop to choose how your screen will project across your displays.
- Once you’ve chosen your setup, select Apply.
Configure Display Settings Windows 10
To get your PC to recognize multiple monitors:
Make sure your cables are connected properly to the new monitors, then press Windows logo key + P to select a display option.
If you need more help, here’s what to do:
- Select Start > Settings > System > Display. Your PC should automatically detect your monitors and show your desktop. If you don’t see the monitors, select Detect.
- In the Multiple displays section, select an option from the list to determine how your desktop will display across your screens.
- Once you’ve selected what you see on your displays, select Keep changes.
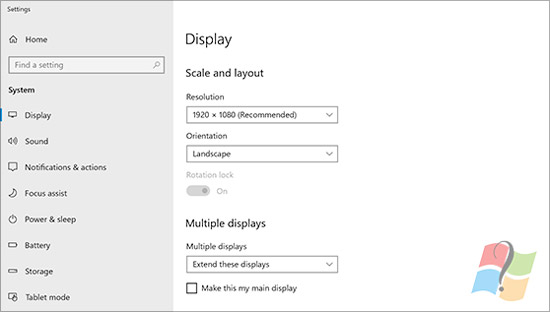
You can change the resolution of your displays. However, we suggest using the recommended resolution to get the most out of your displays.
Step 4: Fine-Tune Display Settings
To ensure the best experience, customize further:
- Resolution: Set the correct resolution for each monitor (found in the Display Settings).
- Primary Display: Choose your main display for taskbar and icons by selecting “Make this my main display” under display settings.
Troubleshooting Common Issues
- Monitor Not Detected: Check cables and connections, or click “Detect” in display settings.
- Resolution Problems: Ensure both monitors support the selected resolution, or manually adjust it.
- Mouse Movement Not Smooth: Rearrange the monitors in the Display settings so they reflect the physical setup on your desk.
Conclusion
Setting up dual monitors on Windows can dramatically improve your efficiency and create a better user experience. Whether for work or entertainment, having more screen real estate is always a plus. Follow these simple steps, and you’ll be enjoying the benefits of dual monitors in no time!


